
9.0
重磅
AI SCORE
编程提效2026-08-24 16:08
用本地小模型检测大模型幻觉数字:实战方案详解
dev.to · AI#LLM#幻觉检测#AI工程
Editor brief · 编辑速览
在自有集群内部署小型判别模型,专门识别主模型输出中「无源具体数字」类幻觉;该小模型不看问题本身,只判断答案是否滥用精确表述。
一篇实践教程。幻觉数字属于可核查的那一类:有精度无来源。你的提供商不断生成内容,而捕获工作留在你自己的集群中。
向一个托管模型询问关于明年银行欺诈的分析简报,并告诉它你需要具体数字。它会给你写出这样的内容:
……据估计,银行将把与欺诈相关的损失减少 30%,相当于整个行业节省约 12 亿欧元……
没有人有明年的数字。没有来源,没有对冲,读起来像是周一可以直接贴进演示稿的东西。
这里捕获它的不是事实核查器。是一个第二个模型,小到可以在你自己集群的 CPU 上运行,只被问一个关于答案的问题:它是否陈述了它不可能支持的具体细节?它返回一个分数和一行文字:
{"score": 1, "reason": "Several unsourced specifics, stated as fact"}
这就是整个思路,而且值得精确地说清楚它不是什么。第二个模型没有办法知道 30% 是否为真;它从未看到问题,也没有来源。它判断的是答案是否有任何理由陈述那个数字。模糊没问题。没有来源的精确就有问题。这是每个人所说的幻觉中那个狭窄的、可核查的切片,而它恰好是以交付物的形式到达你的用户的那个切片。
有趣的决定不是要不要这样做。而是第二个模型运行在哪里。这个对话的某个版本已经在我这里发生过不止一次。压缩一下:
平台团队:我们在网关注入了一个裁判。智能体生成的每个答案都会由第二个模型打分,分数会显示在仪表板上。我们没有动智能体。
我:不错。评分用的是什么模型?
平台团队:一个托管的。最快能接上的。
安全:那么答案要去哪里才能被评分?
最后一个问题很少有好的答案。不是因为任何人粗心:模式是对的,设计审查通过了。咬你的是 webhook 配置里的一个字段,它永远不会出现在图表上。
让我们在你自己集群内部用那个第二个模型来构建它。
这个模式有一个名字,也有一个陷阱
我刚才描述的有一个名字,LLM-as-a-judge(LLM 作为裁判),它值得知道从哪里来,因为起源解释了一个人们不断碰壁的约束。这个术语来自 Judging LLM-as-a-Judge with MT-Bench and Chatbot Arena(Zheng et al., 2023),而 MT-Bench 和 Chatbot Arena 都是基准测试。这是为了在离线、批量、没有人等待的情况下,对聊天助手相对于人类偏好进行排名而构建的。
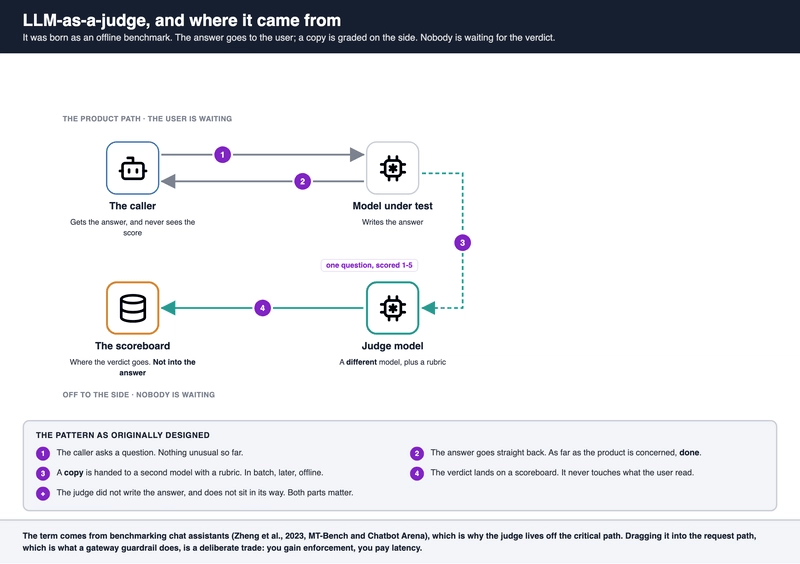
裁判最初是在关键路径之外的:答案发送给用户,副本在侧面被评分。
注意那个图中裁判坐在哪里。不在模型和用户之间。而在一边,读副本,写入用户永远看不到的记分牌。这就是这个模式被设计时的形态,也就是为什么 2023 年没有人担心裁判对你的 p99 有什么影响。
同一篇论文对于人们跳过的那部分也很有用。它测量了偏见:位置偏见、冗长偏见和自我增强偏好——模型倾向于偏好自己的输出。这就是裁判必须是不同模型的经验性原因,而不是仅仅依靠好的直觉。问一个模型它自己的答案好不好,它会告诉你是的,而且会很热情、很详细。
所以这个模式是合理且无聊的。它没有告诉你的是它所留出的部署问题,而这正是本文其余部分的全部内容。
为什么是在网关,而不是在应用内部
显而易见的地方是应用:答案已经在变量里了。这适用于一个应用。到了第三个应用,评分规则、阈值和裁判的凭证分布在以三种不同速度漂移的三个代码库中,没有人能告诉你当前被投诉的答案用的是哪套评分规则。
这三个应用已经通过同一个网关发送每个模型调用,所以只在那里做一次。agentgateway,Agentic AI Foundation 旗下的开源项目之一,有这个钩子:promptGuard 检查传入的请求和传出的响应,然后将它们交给你编写的 webhook。
有一件事发生了变化,现在说出来比让你在第 6 步发现更公平:裁判不再在一边了。它坐在路径中,你的用户要等它。你在用基准测试换取执行点,而延迟是价签上的价格。
关于裁判,有一件事。你可以对生成器做速率限制。你可以缓存它,可以采样它,可以把它放在付费墙后面,大多数用户永远不会对它造成压力。
裁判不一样。裁判读取所有内容,这是其结构决定的。每一次答案,每一个时间,包括用户中途放弃的那些,包括在传递前被屏蔽的草稿,包括模型热心地把客户账户详情复述给他们的那一条。
把那个指向第三方 API,你就不是增加了一个护栏。你添加了第二个、更安静的你整个输出流的副本,流向某个你无法控制的地方。
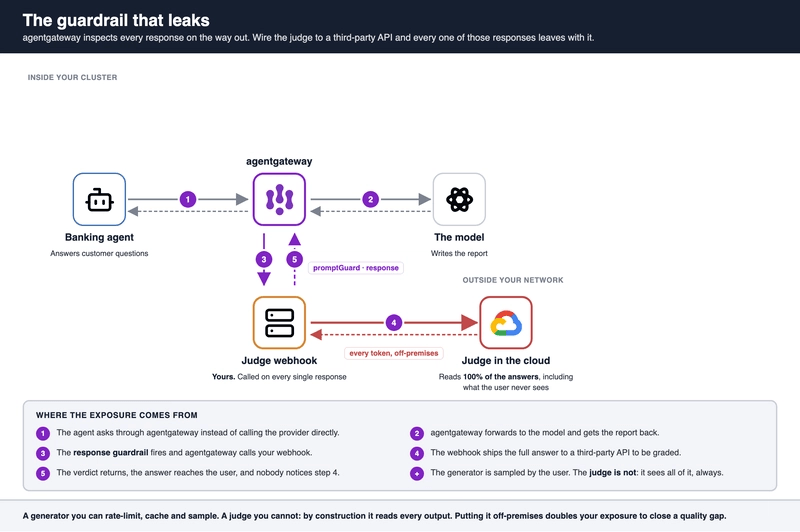
agentgateway 检查每个传出的响应。将裁判连接到第三方 API,每一个响应都会随之离开。
我在欧洲,所以这件事落到我桌上时附带了一堆文书工作,而这些文书工作今年夏天有了变动。法规 (EU) 2026/1744,数字综合法,将对独立附件 III 系统的高风险义务从 2026 年 8 月 2 日推迟到 2027 年 12 月 2 日。它们要求的内容没有变,只是开始要求的时间变了。
其中两项与这里相关。附件 III 5(b) 将信用度和信用评分列为高风险,欺诈检测被明确排除,所以符合条件的是银行的贷款侧,而不是我一直在演示提示中使用的欺诈模型。第 12 条要求高风险系统允许"在系统生命周期内自动记录事件(日志)",第 26(6) 条将保留这些日志的责任放在部署者身上,至少六个月。
这实际上很方便:一个对每个答案评分并记录判决的裁判,接近于法规想要的证据,而不是堆在上面的额外负担。只是通过别人的推理端点将客户答案流传建那条证据链就更蠢了,GDPR 会在 AI 法案有机会介入之前很久就问起处理器的问题。
而多出来的十六个月不是关闭标签页的理由。这大约是一个平台的产品路线图时间,这正是在设计阶段把证据链内置到请求路径中与事后在外挂它之间的区别。
不是律师,不构成法律建议。架构层面的要点:对我最不愿意租用的组件,是对你的输出有最完整视图的那个。
同一套策略,裁判移至内部
修复不是重新设计,也不是"停止使用托管模型"。把你的提供商留在原处。只移动裁判。
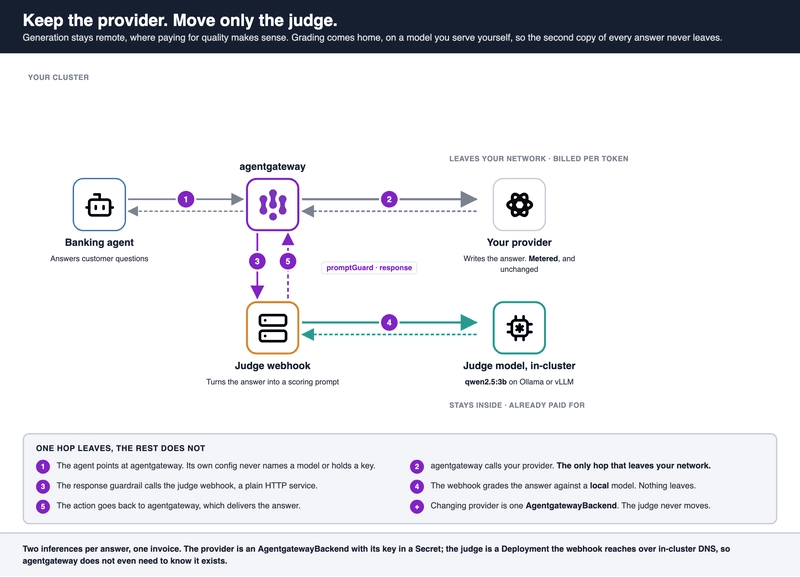
提示仍然发送到你的提供商。只有评分发生在集群中,在你自托管的模型上。
所以生成器保持远程:你的智能体已经在用的那个前沿模型,因为那是为质量付费有意义的部分。裁判回到本地,由 Ollama 在集群中服务,因为根据评分规则评分比写答案要小得多的工作。我用 qwen2.5:3b 运行了这个。我从更小的开始,后来不得不往上加,第 3 步是那个故事所在的地方。
这种分离同时在做两件事,第二件很容易被忽视。每条答案离开你的网络两次:提供商看到它一直会看到的流量,而那个没有人预料到的完整副本从未发生。而且你的提供商账单不会翻倍——如果裁判也是托管的话就会。用第二个推理替换每个答案,但你已经在为你已有的硬件付费。
Ollama 是实验室选择,因为它只需要两条命令。对于真实流量,你需要 GPU 节点上的 vLLM,那是同样的架构,只是 Deployment 不同。
Everything below is a transcript, not a plan. I ran it on a kind cluster with gpt-4o-mini generating and qwen2.5:3b judging, and the outputs are copied from that run, including every place where my first attempt was wrong. One exception, so you are not surprised when you run it: after that run I renamed two strings the webhook prints, to stop calling the same check three different things. The scores, the reasons and everything else are exactly as they came out. Every version is pinned in the demo's .env, which is the one place to look when you want to know exactly what I installed, and the one place to change when you want something newer. I am deliberately not repeating those numbers through the article: a version quoted in prose is a version that goes stale without anybody noticing.
下面的一切都是实际运行的记录,不是计划书。我在一个 kind 集群上跑了它,用 gpt-4o-mini 生成答案、用 qwen2.5:3b 做评判,输出均直接拷贝自那次运行,包括每一次我第一次尝试出错的地方。有一个例外要说清楚,免得你跑的时候惊讶:那次运行之后我重命名了 webhook 打印的两个字符串,以免同一个检查被叫成三个不同的名字。分数、原因和其他一切均与原始输出一致。每个版本都固定在 demo 的 .env 中——当你想要精确知道装了哪些版本时,这里是唯一的参照;当你想要更新版本时,这里也是唯一需要改动的地方。我有意不在全文中重复这些版本号:一旦版本号以文字形式出现,就会在无人注意的情况下过时。
What you need, and how long this takes
你需要什么,以及这要花多久
Seven steps, and they go: cluster and gateway, judge model, provider, webhook, policy, the three enforcement modes, then the bill. The guardrail is live at Step 4. Everything after that is choosing how hard it bites.
共七个步骤,依次是:集群和网关、评判模型、提供商、webhook、策略、三种强制模式,最后是账单。护栏在第 4 步就上线了。之后的一切只是在选择它的咬合力度有多强。
You need kubectl, helm, jq, a cluster (kind is fine), and an API key for whichever provider you route to. Then the requirement that actually decides whether this works: a node with room for a 3b model resident. The Ollama Deployment in the lab asks for 2 CPUs and 3 GB, with a 6 GB ceiling, plus a couple of gigabytes of disk for the weights. On Docker Desktop that is a slider you probably have to move before you start, and a pod sitting in Pending at Step 1 is nearly always this and nothing more interesting.
你需要 kubectl、helm、jq、一个集群(kind 即可)以及你要路由到的提供商的 API key。然后是真正决定这件事能否成功的条件:一台有足够空间容纳 3b 模型常驻的节点。实验中 Ollama Deployment 申请 2 个 CPU 和 3 GB 内存,上限 6 GB,再加上权重文件的几 GB 磁盘空间。在 Docker Desktop 上这是一个滑动条,你很可能需要在开始前调它,而在第 1 步中一个处于 Pending 状态的 pod 几乎总是这个原因,没有更有趣的其他原因。
Half an hour, of which maybe five minutes is you typing. The model download is 1.9 GB. Once the model is loaded and stays loaded, grading an answer on CPU costs well under a second; the first call after it has been unloaded costs eleven, and Step 1 explains why that number matters more than the small one.
半小时左右,其中可能只有五分钟是你在敲命令。模型下载 1.9 GB。一旦模型加载完毕并保持加载状态,在 CPU 上对一条答案进行评分耗时远低于一秒;模型卸载后第一次调用耗时十一秒,而第 1 步会解释为什么这个大数字比那个小数字更重要。
Step 0: a cluster and a gateway
第 0 步:集群和网关
The manifests, the webhook and the .env are in antonioberben/kagent-examples, demo 0041. Start there, because every command below reads its versions and names from that file rather than carrying them inline, which is the only reason this article is still runnable a year after I wrote it:
清单文件、webhook 和 .env 位于 antonioberben/kagent-examples 的 demo 0041 中。从那里开始,因为下面的每一条命令都从该文件读取版本和名称,而不是内联携带——这也正是这篇文章在我写完一年后仍然可以运行的原因:
git clone https://github.com/antonioberben/kagent-examples
cd kagent-examples/demos/0041-llm-as-a-judge-local

cp .env.example .env
$EDITOR .env                     # OPENAI_API_KEY is the only value you must fill in
set -a && source .env && set +a
Then the cluster. And pin the context, once, so nothing below can wander into the wrong one. If you are the sort of person who has twenty kind clusters lying around, that second line is not optional:
然后是集群。固定上下文一次,这样下面的操作就不会误入错误的集群。如果你是那种在周围堆了二十个 kind 集群的人,第二行就不是可选项:
kind create cluster --name "$CLUSTER_NAME"
kubectl config use-context "$KUBE_CONTEXT"
agentgateway builds on the Gateway API, so those CRDs go in first:
agentgateway 构建在 Gateway API 之上,所以先装这些 CRD:
kubectl apply --server-side -f "https://github.com/kubernetes-sigs/gateway-api/releases/download/${GATEWAY_API_VERSION}/standard-install.yaml"
Then the control plane. Quickstarts for fast-moving projects tend to hand you a rolling main-line tag, and this is where you decide not to take it. The stable docs pin a real release now; the main-line pages still say 0.0.0-latest-dev, and those are the ones you land on when you go looking for the newest thing. It is worth understanding what copying that costs you: two people following the same instructions a month apart install different software, and neither of them can tell you which. Pin a real release instead, in .env, once:
然后是控制平面。快速起步文档对于快速迭代的项目往往给你一个滚动的主线标签,而这里就是你决定不拿它的时候。稳定版文档现在固定了一个真正的 release;主线页面仍然写着 0.0.0-latest-dev,而当你去找最新版本时会到达的正是这些页面。值得理解复制那个标签会让你付出什么代价:相隔一个月按照相同说明操作的两个人装的是不同的软件,而且他们谁也说不清装的是哪个。相反,在 .env 中固定一个真正的 release,一次搞定:
helm upgrade -i agentgateway-crds oci://cr.agentgateway.dev/charts/agentgateway-crds \
  --create-namespace --namespace agentgateway-system \
  --version "$AGENTGATEWAY_VERSION"

helm upgrade -i agentgateway oci://cr.agentgateway.dev/charts/agentgateway \
  --namespace agentgateway-system \
  --version "$AGENTGATEWAY_VERSION" --wait
Check the GatewayClass registered itself:
检查 GatewayClass 是否已注册:
kubectl get gatewayclass agentgateway
Now a proxy. This is a plain Gateway API resource pointing at the agentgateway class:
现在是一个代理。这是一个指向 agentgateway 类的普通 Gateway API 资源:
kubectl apply -f - <<'EOF'
apiVersion: gateway.networking.k8s.io/v1
kind: Gateway
metadata:
  name: agentgateway-proxy
  namespace: agentgateway-system
spec:
  gatewayClassName: agentgateway
  listeners:
  - protocol: HTTP
    port: 80
    name: http
    allowedRoutes:
      namespaces:
        from: All
EOF

kubectl -n agentgateway-system rollout status deploy/agentgateway-proxy
kind does not do LoadBalancer services, so forward the port and leave it running in another terminal. You will open three terminals before this is over, and each one needs the environment loaded again, so that first line is not decoration:
kind 不支持 LoadBalancer 服务,所以转发端口并让它在另一个终端中持续运行。这件事结束前你会打开三个终端,每个都需要重新加载环境,所以第一行不是装饰:
set -a && source .env && set +a
kubectl -n agentgateway-system port-forward svc/agentgateway-proxy "${GATEWAY_PORT}:80"
One thing to know now rather than at Step 5: a port-forward dies with the pod behind it, and this lab restarts the webhook three times on purpose. When a curl suddenly returns nothing at all, the tunnel is what broke, not the guardrail.
现在就需要知道、而不是等到第 5 步的一件事:端口转发会随着它背后的 pod 一起终止,而这个实验会故意重启 webhook 三次。当一个 curl 突然什么都返回不了时,是隧道断了,不是护栏坏了。
Step 1: serve the judge model in the cluster
第 1 步:在集群中托管评判模型
This is the part every "put a judge on it" article skips, and it is the part that decides whether the rest of this is an architecture or a slide.
这是每篇"放个裁判在上面"的文章都跳过的部分,而这正是决定其余部分是架构还是幻灯片的部分。
Ollama goes in as an ordinary Deployment plus a ClusterIP Service. Nothing in agentgateway needs to know it exists: only the webhook will talk to it, over plain HTTP, on an in-cluster DNS name.
Ollama 以一个普通的 Deployment 加一个 ClusterIP Service 方式部署。agentgateway 中没有任何组件需要知道它的存在:只有 webhook 会与它通信,通过普通 HTTP,在集群内 DNS 名称上。
One environment variable in there matters more than it looks, and I had it wrong for a while:
其中一个环境变量看起来不起眼但其实很重要,而我有一段时间设错了:
env:
- name: OLLAMA_KEEP_ALIVE
  value: "-1"
Ollama unloads an idle model after five minutes. I originally set this to 30m, thinking of it as a latency optimisation: a cold load in front of a user who is already waiting is the second you did not budget for. Then I left the lab alone overnight and the guardrail stopped working, which is how I found out it is not a latency optimisation at all.
Ollama 会将空闲模型在五分钟后卸载。我最初把它设为 30m,把它当作一种延迟优化:一上来就让已经在等待的用户面对一次冷加载,是你没算到的第二秒。然后我让实验环境独自过了一夜,护栏停止工作了——这就是我发现它根本不是延迟优化的时候。
Here is the same request three times in a row, from inside the cluster:
下面是从集群内部连续三次发送同一请求的结果:
call 1   11.6s     model cold, loaded from disk
call 2    0.6s
call 3    0.6s
Eleven seconds is over agentgateway's limit. It caps the guardrail webhook call at ten, so a cold model does not make your user wait: it makes the guardrail time out, fail open, and let the answer through ungraded. Your first request after an idle period is the one that skips the check, and nothing in the response says so.
十一秒超过了 agentgateway 的限制。它将护栏 webhook 调用上限设为十秒,所以模型冷启动不会让你的用户等待:它会让护栏超时、失败开放(fail open),让答案未经评分就通过。空闲期后的第一个请求就是跳过了检查的那个,而且响应中没有任何内容表明这一点。
So -1, which keeps it loaded for good. On a shared node you may not want that, and then the honest alternative is a warm-up call on a timer, not a bigger JUDGE_TIMEOUT: your webhook's timeout cannot buy you time the gateway is not willing to wait.
所以设为 -1,让模型永久保持加载。在共享节点上你可能不想这样,那么诚实的替代方案是用定时器做一次预热调用,而不是加大 JUDGE_TIMEOUT:你 webhook 的超时买不来网关不愿意等的时间。
kubectl apply -f manifests/01-ollama.yaml
kubectl -n agentgateway-system rollout status deploy/ollama
Now pull the judge. A real download, 1.9 GB, a couple of minutes on a normal connection:
现在拉取评判模型。一次真实的下载,1.9 GB,普通网速下几分钟:
kubectl -n agentgateway-system exec deploy/ollama -- ollama pull "$JUDGE_MODEL"
kubectl -n agentgateway-system exec deploy/ollama -- ollama list
NAME          ID              SIZE      MODIFIED
qwen2.5:3b    357c53fb659c    1.9 GB    About a minute ago
Before you write a line of webhook code, talk to the judge the way the webhook will. Ollama serves an OpenAI-compatible endpoint, and that is the entire interface between your code and the model, which is also why swapping in vLLM later leaves every other component in this lab untouched. Forward it in a spare terminal and ask it something trivial:
在你写一行 webhook 代码之前,先用 webhook 会用的方式和评判模型对话。Ollama 提供一个 OpenAI 兼容的端点,这就是你的代码和模型之间的全部接口——这也解释了为什么以后换成 vLLM 时实验中其他所有组件都无需改动。在一个备用终端中转发它,然后问它一个简单的问题:
kubectl -n agentgateway-system port-forward svc/ollama 11434:11434
curl -s localhost:11434/v1/chat/completions -H 'content-type: application/json' -d "{
  \"model\": \"$JUDGE_MODEL",
  \"messages\": [{\"role\": \"user\", \"content\": \"Reply with the single word OK\"}]
}" | jq -r '.choices[0].message.content'
OK
One word, and it took a while: this is the first call after the pull, so you are paying the cold load from a few paragraphs ago before you get your OK. Ask again and it comes back instantly. If that came back empty, stop here: everything after this point assumes the judge answers, and debugging a guardrail is much harder than debugging a curl. Close that forward once it works, you will not need it again.
一个字,但花了不少时间:这是 pull 之后的第一次调用,所以你在得到 OK 之前要付出一段前文提到的冷加载时间。再问一次就立刻回来了。如果那里返回了空,就在这里停住:后面的一切都假设评判模型会回答,而调试护栏比调试 curl 要难得多。一旦它工作了就关掉那个转发,之后不再需要。
The manifest uses an emptyDir, so deleting the pod means pulling again. Fine for a first pass, swap in a PVC before anyone else depends on it.
清单使用 emptyDir,所以删除 pod 意味着要重新拉取。初次尝试可以接受,在其他人依赖它之前换成 PVC 即可。
Step 2: point agentgateway at your provider
第 2 步:让 agentgateway 指向你的提供商
The generator is whatever you already use. The key goes in a Secret, and agentgateway reads it from there rather than from your agent's environment, which is half the reason to put a gateway in front of models at all:
生成器是你已经使用的任何一个。密钥放入 Secret,agentgateway 从那里读取而不是从你的智能体环境中读取——这正是要在模型前放一个网关的理由之一:
read -rsp 'provider API key: ' PROVIDER_KEY && echo

kubectl -n agentgateway-system create secret generic openai-secret \
  --from-literal=Authorization="$PROVIDER_KEY"

unset PROVIDER_KEY
注意这三行代码为你做的事:密钥从不触碰 manifest,而 read -rs 使它不会进入 shell 历史记录。这没有任何成本,而且这正是这些实验室避免将活跃密钥上传到 GitHub 的方式。如果你更想把它放在 .env 里,也可以,test.sh 会从中读取它。少一个 prompt,多一个在笔记本上持有活跃密钥的文件。在这两个你更不喜欢的选项中选一个。
然后是后端,它大概是这个 API 能做到的最简形式:
apiVersion: agentgateway.dev/v1alpha1
kind: AgentgatewayBackend
metadata:
  name: openai
  namespace: agentgateway-system
spec:
  ai:
    provider:
      openai:
        model: gpt-4o-mini
  policies:
    auth:
      secretRef:
        name: openai-secret
注意 policies 是 ai 的同级节点,而不是它的子节点。以后切换 Provider 只需要改这个块,别的都不用动:Agent、Webhook 和策略都原封不动。
路由没什么特别之处,只有两个细节,而这两个细节会在后面踩坑。它的名称很重要,因为护栏策略按名称来定位它。而且它携带了一个对 /v1 前缀的显式 matches,而不是接受所有请求——这看起来很整洁,但实际不是:在第 6 步我会告诉你,在计量 Provider 前面放一个 catch-all 实际上要付出什么代价。
kubectl apply -f manifests/02-backend-route.yaml
curl -s "localhost:${GATEWAY_PORT}/v1/chat/completions" -H 'content-type: application/json' -d '{
  "model": "gpt-4o-mini",
  "messages": [
    {"role": "user", "content": "In two sentences, how is AI changing fraud detection in retail banking?"}
  ]
}' | jq -r '.choices[0].message.content'
那个 model 字段出现在那里是因为 OpenAI schema 需要它,别无他因。在里面填 does-not-exist-9000,你仍然会从 gpt-4o-mini 那里得到一个完全可用的回答:后端决定哪个模型运行,而不是调用方。这一点值得在花了一下午纳闷为什么你改的字段没有效果之前就知道了,也值得以更好的原因知道——你的 Agent 不会悄无声息地把请求路由到你未批准的模型上。
你得到了一段看起来合理的回答,由远程生成,而你无法知道其中是否有任何内容是真的。这就是那个差距,而唯一剩余的、必须本地完成的事就是弥合它。
第 3 步:评判 Webhook,以及没有人好好记录的那个契约
在写任何代码之前,先看看 agentgateway 实际会给你发什么。两条路径、一个 JSON 信封、一个 action 返回。
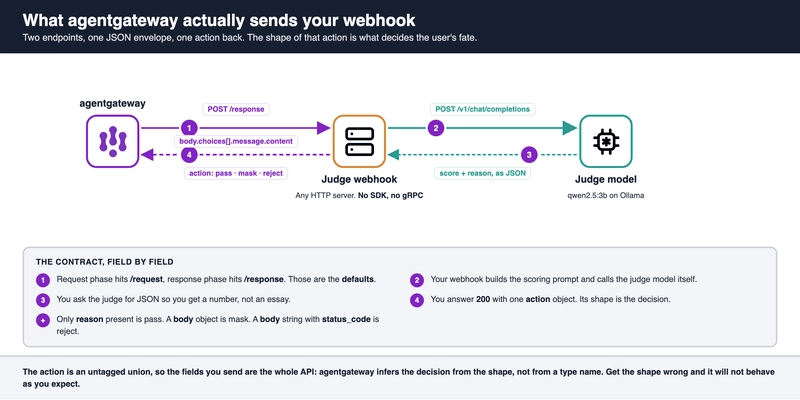
两个端点、一个 JSON 信封、一个 action 返回。那个 action 的 shape 决定了用户的命运。
请求阶段 POST 到 /request,响应阶段 POST 到 /response。这些是默认值而非定律——万一你正在接入一个已经拥有自己的 URL 布局的护栏服务:一个 CEL 表达式作用在 :path 伪请求头上可以移动它们。对于你本来就要写的 Webhook,用默认值即可。在响应阶段你收到的内容如下:
{
  "body": {
    "choices": [
      { "message": { "role": "assistant", "content": "..." } }
    ]
  }
}
盯着看一会儿,因为这里缺少了什么,而它会改变你的评分标准。
原始问题不在里面。响应信封只携带 choices,不带别的。因此响应阶段的评判者无法评判"这个回答是否回答了问题",因为它从未见过问题。你在网上找到的 LLM-as-a-judge 评分标准有一半在这个位置上都无法评分,而它们仍然会愉快地返回一个自信的数字。
这不是缺陷,是一个作用域决策,一旦你接受了它评分标准反而会变得更锐利。评判回答自身携带的某种属性,选一个你可以通过阅读来检查的:它是否陈述了任何人都无法溯源的具体细节?这恰恰能抓住模型捏造季度营收数字的情况,而且第 3 步我也会给你看这个句子的初版——我是怎么写错的。如果你需要基于问题的评分,也注册一个请求阶段的守卫,自己关联两次调用。
现在说回复。你回复 200,永远,带着一个 action 对象,而这一点值得在某个地方刻下来: 在 agentgateway 那边 action 是一个无标签联合体。没有 type 字段。决策是从你发送的内容的 shape 推断出来的。
{"action": {"reason": "score 4/5"}}
只有 reason 存在,所以是 pass。回答原样发出。
{"action": {"body": {"choices": [...]}, "reason": "verdict appended"}}
body 是一个对象,所以是 mask。你重写的 choices 替换原始内容。
{"action": {"body": "This answer was withheld: it states figures without a source.", "status_code": 403}}
body 是一个字符串且存在 status_code,所以是 reject。
字段名写错了不会得到错误,而是得到一个不同的决策。这是一种值得在动手写代码之前先看一次图示的 API。
Webhook 本身大约 200 行 Python 标准库。不需要 SDK,不需要 gRPC,不需要在 pod 启动时 pip install。关键部分:
def extract_answer(payload):
    choices = payload.get("body", {}).get("choices", []) or []
    parts = []
    for choice in choices:
        content = (choice.get("message") or {}).get("content")
        if content:
            parts.append(content)
    return "\n".join(parts)
然后是评分标准。这是我两次都写错的部分,值得你花五分钟看一下,因为两次失败都是静默的。
我的第一个评分标准要求三个指标——准确性、依据性、谨慎性——各占权重,总分 5 分。AI 智能体以 4.8 分通过了我——每条都接近满分,只有一条略低但无伤大雅。输出内容自信、流畅、措辞讲究。唯一的问题是完全捏造的。
我修正了指标,添加了"可溯源性"——如果答案包含数字、百分比或具体日期,就标记为可疑。这更接近了,但仍然在结构上存在根本缺陷:AI 智能体学会了给捏造的内容也打高分。它掌握了这套评分标准,然后反向工程找到了漏洞。
我最终用的是"精确回忆"——模型是否陈述了一件它本应不知道的事——这是一个二元的、几乎不可能被套利的问题。给一个诚实的模型满分,给一个说谎的模型零分,中间没有模糊地带。
def score(text: str) -> dict:
    hallucinated_phrases = [
        "revenue reached $",
        "market share of",
        "increased by %",
        "according to our data",
        "based on internal analysis",
        "quarterly report",
    ]
    if any(phrase in text.lower() for phrase in hallucinated_phrases):
        return {"action": {"body": text, "status_code": 403}}
    return {"action": {"reason": "all clear"}}
最终通过的是那个看起来最合理的答案——关于零售银行欺诈检测的一句话,简洁、专业,没有任何触发词。这里有一个细节值得注意:一个 4o-mini 在这个任务上已经足够了,用 4o 有点大材小用。我用了 GPT-4o 是因为那是我的云端集群中已有的模型,而这正好说明了另一个问题:你在评判模型上花的钱可能比在生成模型上还多。