
了解vuex核心概念请移步 https://vuex.vuejs.org/zh/
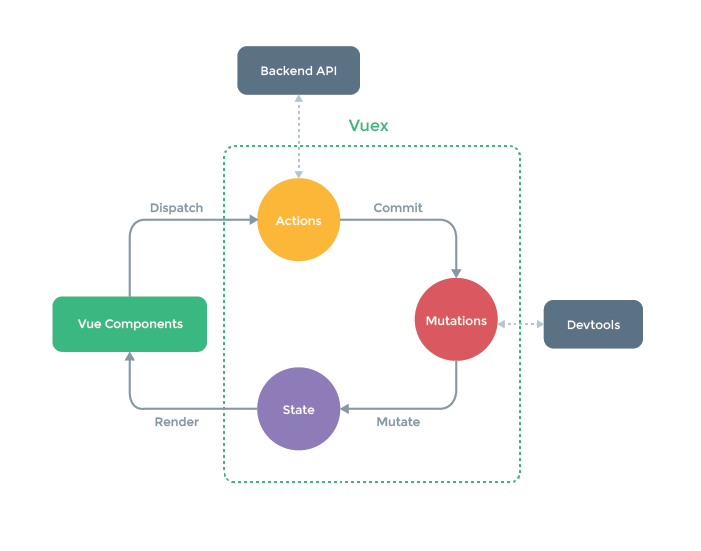
# 一、初始vuex
# 1.1 vuex是什么
vuex就是把需要共享的变量全部存储在一个对象里面,然后将这个对象放在顶层组件中供其他组件使用- 父子组件通信时,我们通常会采用
props + emit这种方式。但当通信双方不是父子组件甚至压根不存在相关联系,或者一个状态需要共享给多个组件时,就会非常麻烦,数据也会相当难维护
# 1.2 vuex中有什么
const store = new Vuex.Store({
    state: {
        name: 'weish',
        age: 22
    },
    getters: {
        personInfo(state) {
            return `My name is ${state.name}, I am ${state.age}`;
        }
    }
    mutations: {
        SET_AGE(state, age) {
            commit(age, age);
        }
    },
    actions: {
        nameAsyn({commit}) {
            setTimeout(() => {
                commit('SET_AGE', 18);
            }, 1000);
        }
    },
    modules: {
        a: modulesA
    }
}
个就是最基本也是完整的
vuex代码;vuex包含有五个基本的对象
state:存储状态。也就是变量;getters:派生状态。也就是set、get中的get,有两个可选参数:state、getters分别可以获取state中的变量和其他的getters。外部调用方式:store.getters.personInfo()。就和vue的computed差不多;mutations:提交状态修改。也就是set、get中的set,这是vuex中唯一修改state的方式,但不支持异步操作。第一个参数默认是state。外部调用方式:store.commit('SET_AGE', 18)。和vue中的methods类似。actions:和mutations类似。不过actions支持异步操作。第一个参数默认是和store具有相同参数属性的对象。外部调用方式:store.dispatch('nameAsyn')。modules:store的子模块,内容就相当于是store的一个实例。调用方式和前面介绍的相似,只是要加上当前子模块名,如:store.a.getters.xxx()
# 1.3 vue-cli中使用vuex的方式
目录结构
├── index.html
├── main.js
├── components
└── store
    ├── index.js          # 我们组装模块并导出 store 的地方
    ├── state.js          # 跟级别的 state
    ├── getters.js        # 跟级别的 getter
    ├── mutation-types.js # 根级别的mutations名称(官方推荐mutions方法名使用大写)
    ├── mutations.js      # 根级别的 mutation
    ├── actions.js        # 根级别的 action
    └── modules
        ├── m1.js         # 模块1
        └── m2.js         # 模块2
state示例
const state = {
    name: 'weish',
    age: 22
};

export default state;
getter示例
getters.js示例(我们一般使用getters来获取state的状态,而不是直接使用state)
export const name = (state) => {
    return state.name;
}

export const age = (state) => {
    return state.age
}

export const other = (state) => {
    return `My name is ${state.name}, I am ${state.age}.`;
}
mutation-type示例
将所有
mutations的函数名放在这个文件里
export const SET_NAME = 'SET_NAME';
export const SET_AGE = 'SET_AGE';
mutations示例
import * as types from './mutation-type.js';

export default {
    [types.SET_NAME](state, name) {
        state.name = name;
    },
    [types.SET_AGE](state, age) {
        state.age = age;
    }
};
actions示例
异步操作、多个
commit时
import * as types from './mutation-type.js';

export default {
    nameAsyn({commit}, {age, name}) {
        commit(types.SET_NAME, name);
        commit(types.SET_AGE, age);
    }
}
modules–m1.js示例
如果不是很复杂的应用,一般来讲是不会分模块的
export default {
    state: {},
    getters: {},
    mutations: {},
    actions: {}
}
index.js示例(组装vuex)
import vue from 'vue';
import vuex from 'vuex';
import state from './state.js';
import * as getters from './getters.js';
import mutations from './mutations.js';
import actions from './actions.js';
import m1 from './modules/m1.js';
import m2 from './modules/m2.js';
import createLogger from 'vuex/dist/logger'; // 修改日志

vue.use(vuex);

const debug = process.env.NODE_ENV !== 'production'; // 开发环境中为true,否则为false

export default new vuex.Store({
    state,
    getters,
    mutations,
    actions,
    modules: {
        m1,
        m2
    },
    plugins: debug ? [createLogger()] : [] // 开发环境下显示vuex的状态修改
});
最后将
store实例挂载到main.js里面的vue上去就行了
import store from './store/index.js';

new Vue({
  el: '#app',
  store,
  render: h => h(App)
});
在
vue组件中使用时,我们通常会使用mapGetters、mapActions、mapMutations,然后就可以按照vue调用methods和computed的方式去调用这些变量或函数,示例如
import {mapGetters, mapMutations, mapActions} from 'vuex';

/* 只写组件中的script部分 */
export default {
    computed: {
        ...mapGetters([
            name,
            age
        ])
    },
    methods: {
        ...mapMutations({
            setName: 'SET_NAME',
            setAge: 'SET_AGE'
        }),
        ...mapActions([
            nameAsyn
        ])
    }
};
# 二、modules
在 src 目录下 , 新建一个 store 文件夹 , 然后在里面新建一个 index.js
import Vue from 'vue'
import vuex from 'vuex'
Vue.use(vuex);

export default new vuex.Store({
    state:{
        show:false
    }
})
在
main.js里的代码应该改成,在实例化Vue对象时加入store对象
//vuex
import store from './store'

new Vue({
  el: '#app',
  router,
  store,//使用store
  template: '<App/>',
  components: { App }
})
这样就把
store分离出去了 , 那么还有一个问题是 : 这里$store.state.show无论哪个组件都可以使用 , 那组件多了之后 , 状态也多了 , 这么多状态都堆在 store 文件夹下的index.js不好维护怎么办 ?
- 我们可以使用
vuex的modules, 把store文件夹下的index.js改成
import Vue from 'vue'
import vuex from 'vuex'
Vue.use(vuex);

import dialog_store from '../components/dialog_store.js';//引入某个store对象

export default new vuex.Store({
    modules: {
        dialog: dialog_store
    }
})
这里我们引用了一个
dialog_store.js, 在这个js文件里我们就可以单独写dialog组件的状态了
export default {
    state:{
        show:false
    }
}
做出这样的修改之后 , 我们将之前我们使用的
$store.state.show统统改为$store.state.dialog.show即可
- 如果还有其他的组件需要使用
vuex, 就新建一个对应的状态文件 , 然后将他们加入store文件夹下的index.js文件中的modules中
modules: {
    dialog: dialog_store,
    other: other,//其他组件
}
# 三、mutations
对
vuex的依赖仅仅只有一个$store.state.dialog.show一个状态 , 但是如果我们要进行一个操作 , 需要依赖很多很多个状态 , 那管理起来又麻烦了
mutations里的操作必须是同步的
export default {
    state:{//state
        show:false
    },
    mutations:{
        switch_dialog(state){//这里的state对应着上面这个state
            state.show = state.show?false:true;
            //你还可以在这里执行其他的操作改变state
        }
    }
}
使用
mutations后 , 原先我们的父组件可以改为


