
面试问「Vue 的生命周期有哪些」,背出八个钩子的名字不难。难的是下一个问题:请求应该发在 created 还是 mounted,为什么?这时候光背名字就不够了,得知道每个钩子跑的那一刻,实例上到底有什么、没有什么。这篇的做法是往八个钩子里各塞一段 console.log,把 $el、$data、message 三个东西在每个阶段的值都打出来,对着输出一段段解释。看完你不光能说清顺序,还能自己判断某段代码该往哪个钩子里放。
每个 Vue 实例在被创建之前都要经过一系列的初始化过程,这个过程就是 Vue 的生命周期。
在本篇文章中,我们将从浅入深,和大家一起学习以下知识:
- 八个钩子的完整顺序,以及每个阶段实例上有什么
beforeCreate和created之间到底发生了什么- 为什么没有
el选项时生命周期会停在created render、template、outer HTML三者的优先级- 数据更新时
beforeUpdate和updated的触发时机 - 销毁阶段该清理什么,不清理会怎样
- 请求、DOM 操作、定时器分别该放在哪个钩子里
- Vue 3 的钩子改名和组合式 API 的写法
# 一、生命周期钩子函数
Vue 2 常用的八个钩子按执行顺序是这样的:
beforeCreatecreatedbeforeMountmountedbeforeUpdateupdatedbeforeDestroydestroyed
除了这八个,Vue 2 还有 activated / deactivated(配合 keep-alive 用)和 errorCaptured(捕获子孙组件错误),日常用得少但真到场景里没有替代品。
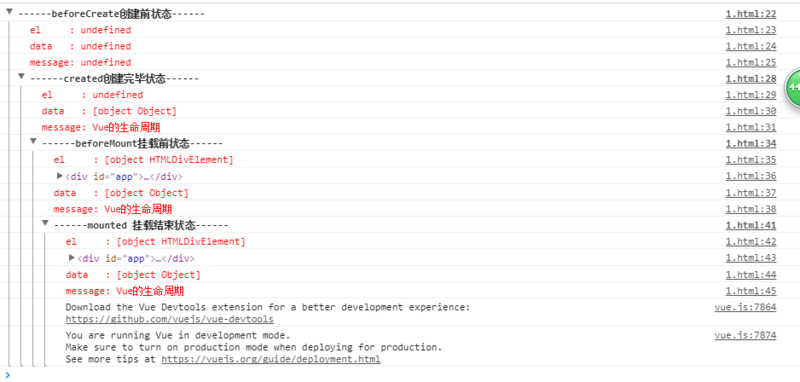
下面这段代码把八个钩子全填上了,每个钩子里打印 $el、$data、message 三个值。直接扔进浏览器跑一遍,控制台的输出比任何图都直观:
var vm = new Vue({
    el: '#app',
    data: {
      message: 'Vue的生命周期'
    },
    beforeCreate: function() {
      console.group('------beforeCreate创建前状态------');
      console.log("%c%s", "color:red" , "el     : " + this.$el); //undefined
      console.log("%c%s", "color:red","data   : " + this.$data); //undefined
      console.log("%c%s", "color:red","message: " + this.message)
    },
    created: function() {
      console.group('------created创建完毕状态------');
      console.log("%c%s", "color:red","el     : " + this.$el); //undefined
      console.log("%c%s", "color:red","data   : " + this.$data); //已被初始化
      console.log("%c%s", "color:red","message: " + this.message); //已被初始化
    },
    beforeMount: function() {
      console.group('------beforeMount挂载前状态------');
      console.log("%c%s", "color:red","el     : " + (this.$el)); //已被初始化
      console.log(this.$el);
      console.log("%c%s", "color:red","data   : " + this.$data); //已被初始化
      console.log("%c%s", "color:red","message: " + this.message); //已被初始化
    },
    mounted: function() {
      console.group('------mounted 挂载结束状态------');
      console.log("%c%s", "color:red","el     : " + this.$el); //已被初始化
      console.log(this.$el);
      console.log("%c%s", "color:red","data   : " + this.$data); //已被初始化
      console.log("%c%s", "color:red","message: " + this.message); //已被初始化
    }
  })
更新和销毁那四个钩子的写法完全一样,只是打印的分组名不同:
var vm = new Vue({
    // ...上面的选项省略
    beforeUpdate: function () {
      console.group('beforeUpdate 更新前状态===============》');
      console.log("%c%s", "color:red","el     : " + this.$el);
      console.log(this.$el);
      console.log("%c%s", "color:red","data   : " + this.$data);
      console.log("%c%s", "color:red","message: " + this.message);
    },
    updated: function () {
      console.group('updated 更新完成状态===============》');
      console.log("%c%s", "color:red","el     : " + this.$el);
      console.log(this.$el);
      console.log("%c%s", "color:red","data   : " + this.$data);
      console.log("%c%s", "color:red","message: " + this.message);
    },
    beforeDestroy: function () {
      console.group('beforeDestroy 销毁前状态===============》');
      console.log("%c%s", "color:red","el     : " + this.$el);
      console.log(this.$el);
      console.log("%c%s", "color:red","data   : " + this.$data);
      console.log("%c%s", "color:red","message: " + this.message);
    },
    destroyed: function () {
      console.group('destroyed 销毁完成状态===============》');
      console.log("%c%s", "color:red","el     : " + this.$el);
      console.log(this.$el);
      console.log("%c%s", "color:red","data   : " + this.$data);
      console.log("%c%s", "color:red","message: " + this.message)
    }
  })
官方那张生命周期图把整条链路画得很完整,后面每一节讲的都是这张图上的一小段:
# 二、beforeCreate 和 created 之间
先看这一段的输出。beforeCreate 里 el 和 data 都是 undefined,message 也拿不到;到了 created,data 已经初始化好了,message 有值了,但 el 还是 undefined。
这中间 Vue 干的事情是初始化事件系统和进行数据的观测。所谓数据观测,就是把 data 里的每个属性用 Object.defineProperty 改造成带 getter/setter 的响应式属性,之后改这些属性视图才会跟着变。这个改造过程的细节,我在 实现数据的双向绑定 mvvm 里从零写过一遍。
所以在 created 这一刻,数据是活的,DOM 还没有。
这条结论直接决定了一个高频问题的答案:请求放哪儿?放 created 就够了。数据已经能读能写,请求发出去、回来赋值给 data,视图渲染时自然带上数据,比放 mounted 早一步,能少一次「先渲染空白再渲染数据」的抖动。
反过来,任何需要操作真实 DOM 的代码(获取元素宽高、初始化第三方图表库、绑原生事件)都不能放在 created 里,因为这时候 $el 是 undefined。
# 三、created 到 beforeMount
这一段是整个生命周期里分支最多的地方:

Vue 首先会判断实例上有没有 el 选项。有就继续向下编译;没有 el 选项,编译就停在这里,生命周期也跟着停住,直到你手动在这个实例上调用 vm.$mount(el)。
把上面那段代码里的 el: '#app', 注释掉再跑,可以看到控制台输出到 created 就没了:
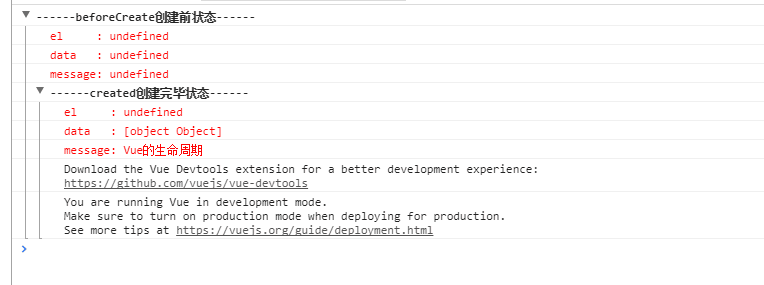
如果后面继续调用 vm.$mount(el),代码就会接着往下执行。这里的 el 参数就是要挂载的 DOM 节点。
vm.$mount('#app')
这个设计在实际项目里是有用的。异步场景下你可能希望实例先创建、数据先备好,等某个条件满足了再挂到页面上,$mount 就是那个开关。
# 3.1 template 选项对生命周期的影响
过了 el 这一关,Vue 接着判断有没有 template 选项:
- 有
template参数选项,就把它作为模板编译成render函数 - 没有
template选项,就把外部 HTML(也就是el指向的那个元素本身的 HTML)作为模板编译 - 所以
template中的模板优先级要高于outer HTML
改一下代码验证。在 HTML 结构里写一串内容,同时在 Vue 对象里也给一个 template:
<div id="app">
  <!--html 中修改的-->
  <h1>{{message + '这是在outer HTML中的'}}</h1>
</div>
var vm = new Vue({
  el: '#app',
  // 在 vue 配置项中修改的
  template: "<h1>{{message +'这是在template中的'}}</h1>",
  data: {
    message: 'Vue的生命周期'
  }
})
页面输出的是 Vue的生命周期这是在template中的。把 template 选项注释掉再跑,输出变成 Vue的生命周期这是在outer HTML中的。原文这段示例的实例代码少了收尾的括号,直接复制会报语法错误,这里补上了。
顺便说一句,el 的判断为什么要排在 template 前面?因为 Vue 需要先通过 el 找到对应的 outer template,el 都没有的话,「外部 HTML」这个兜底选项根本无从谈起。
除了 template,Vue 实例里还可以直接写 render 函数,它以 createElement 作为参数,返回虚拟节点,而且可以直接嵌入 JSX:
new Vue({
    el: '#app',
    render: function(createElement) {
        return createElement('h1', 'this is createElement')
    }
})


