# React全部api解读|原理篇

> 本文系统梳理了 React 的全部核心 API，包括组件类（Component、PureComponent）、内置组件（Fragment、StrictMode）、高阶组件（forwardRef、memo）等，详细解析每个 API 的原理、用法及其在实际开发中的应用场景，帮助开发者全面掌握 React 的基础与进阶知识。

- 原文：https://feinterview.poetries.top/docs/principle-docs/react/26-React%E5%85%A8%E9%83%A8api%E8%A7%A3%E8%AF%BB
- 来源：前端进阶之旅（feinterview.poetries.top）
- 更新：2026.10.09
- 可见范围：免费部分

---

<!-- principle-learning-suite:start -->
<div class="article-learning-label">文章学习导航</div>

<div class="article-learning-label">面试总览</div>

- 按用途认识接口：描述、状态、同步、优化、宿主入口
- `memo` 与 `PureComponent` 的比较范围不同
- 引用用于命令式能力，不替代声明式状态
- 懒加载负责代码，挂起边界负责等待界面
- 删除与变更接口按项目主版本核对

**学习 `React` 接口，先看它管哪条边界：界面描述、状态变化、外部同步还是性能优化。** 比如记忆化只帮助减少部分重复工作，引用提供必要的命令式入口，懒加载和挂起边界则处理代码或资源等待。相似名称不代表相同契约，自定义比较的返回含义也要分清。旧生命周期、挂载入口和引用传递存在版本差异，写代码前对照项目使用的版本。

**版本校准：** 本文若分析 `ReactDOM.render`、旧生命周期或栈调和，应把它视为理解架构演进的历史路径。`React 19` 已移除 `ReactDOM.render`，当前客户端入口使用 `createRoot`；并发渲染也必须区分可中断的渲染阶段与同步提交阶段。迁移前对照 [React 19 官方升级指南](https://react.dev/blog/2024/04/25/react-19-upgrade-guide)。
<!-- principle-learning-suite:end -->

## 组件类

组件类，详细分的话有三种类，第一类说白了就是我平时用于继承的基类组件`Component`,`PureComponent`,还有就是`react`提供的内置的组件，比如`Fragment`,`StrictMode`,另一部分就是高阶组件`forwardRef`,`memo`等。

![](https://s.poetries.top/images/20210504203949.png)

### Component

`Component`是`class`组件的根基。类组件一切始于`Component`。对于`React.Component`使用，我们没有什么好讲的。我们这里重点研究一下`react`对`Component`做了些什么。

```js
react/src/ReactBaseClasses.js
function Component(props, context, updater) {
  this.props = props;
  this.context = context;
  this.refs = emptyObject;
  this.updater = updater || ReactNoopUpdateQueue;
}

```

这就是`Component`函数，其中`updater`对象上保存着更新组件的方法。

**我们声明的类组件是什么时候以何种形式被实例化的呢？**

```
react-reconciler/src/ReactFiberClassComponent.js
```

**constructClassInstance**

```js
function constructClassInstance(
    workInProgress,
    ctor,
    props
){
   const instance = new ctor(props, context);
    instance.updater = {
        isMounted,
        enqueueSetState(){
            /* setState 触发这里面的逻辑 */
        },
        enqueueReplaceState(){},
        enqueueForceUpdate(){
            /* forceUpdate 触发这里的逻辑 */
        }
    }
}

```

对于`Component`， `react` 处理逻辑还是很简单的，实例化我们类组件，然后赋值`updater`对象，负责组件的更新。然后在组件各个阶段，执行类组件的`render`函数，和对应的生命周期函数就可以了。

### PureComponent

`PureComponent`和 `Component`用法，差不多一样，唯一不同的是，纯组件`PureComponent`会浅比较，`props`和`state`是否相同，来决定是否重新渲染组件。所以一般用于**性能调优**，减少**render**次数。

什么叫做**浅比较**，我这里举个列子：

```js
class Index extends React.PureComponent{
    constructor(props){
        super(props)
        this.state={
           data:{
              name:'alien',
              age:28
           }
        }
    }
    handerClick= () =>{
        const { data } = this.state
        data.age++
        this.setState({ data })
    }
    render(){
        const { data } = this.state
        return <div className="box" >
        <div className="show" >
            <div> 你的姓名是: { data.name } </div>
            <div> 年龄： { data.age  }</div>
            <button onClick={ this.handerClick } >age++</button>
        </div>
    </div>
    }
}

```

![pureComponent.gif](![](https://s.poetries.top/images/202203211401980.png)) 

**点击按钮，没有任何反应**，因为`PureComponent`会比较两次`data`对象，都指向同一个`data`,没有发生改变，所以不更新视图。

解决这个问题很简单，只需要在`handerClick`事件中这么写：

```js
 this.setState({ data:{...data} })

```

**浅拷贝**就能根本解决问题。

### memo

`React.memo`和`PureComponent`作用类似，可以用作性能优化，`React.memo` 是高阶组件，函数组件和类组件都可以使用， 和区别`PureComponent`是 `React.memo`只能对`props`的情况确定是否渲染，而`PureComponent`是针对`props`和`state`。

`React.memo` 接受两个参数，第一个参数原始组件本身，第二个参数，可以根据一次更新中`props`是否相同决定原始组件是否重新渲染。是一个返回布尔值，`true` 证明组件无须重新渲染，`false`证明组件需要重新渲染，这个和类组件中的`shouldComponentUpdate()`正好相反 。

**React.memo: 第二个参数 返回 `true` 组件不渲染 ， 返回 `false` 组件重新渲染。** **shouldComponentUpdate: 返回 `true` 组件渲染 ， 返回 `false` 组件不渲染。**

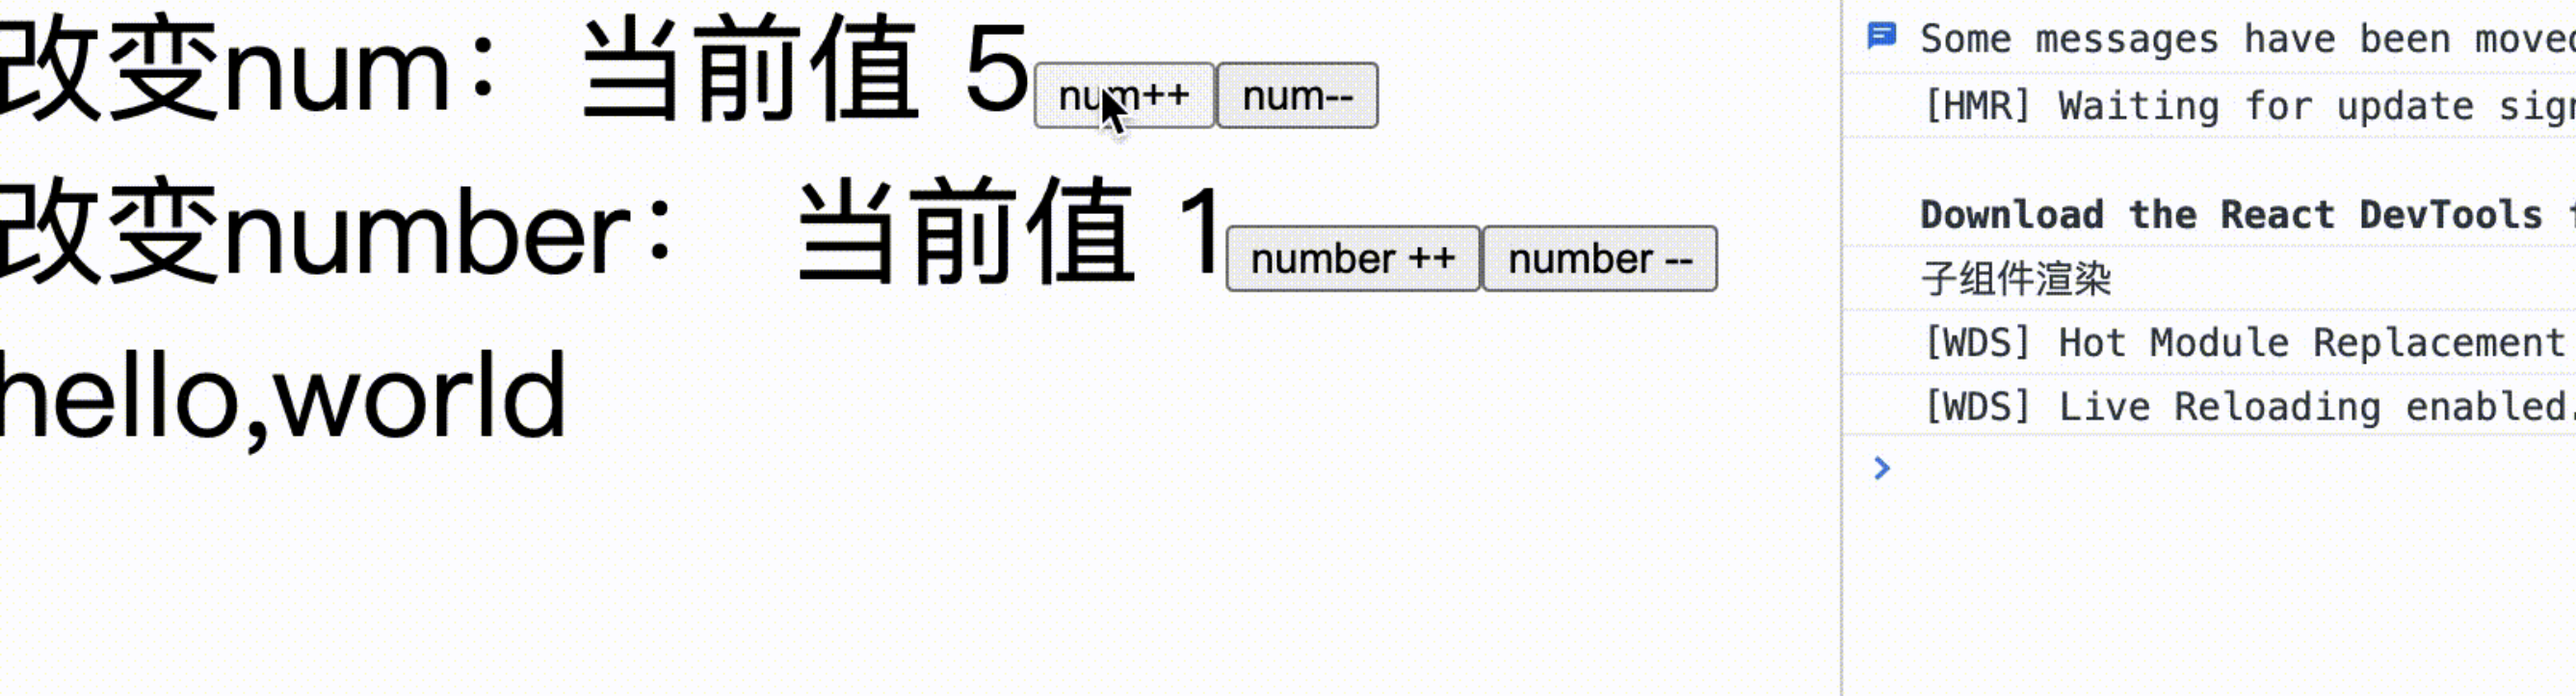
接下来我们做一个场景，控制组件在仅此一个`props`数字变量，一定范围渲染。

例子🌰：

控制 `props` 中的 `number` ：

- 1 只有 `number` 更改，组件渲染。
- 2 只有 `number` 小于 5 ，组件渲染。

```js
function TextMemo(props){
    console.log('子组件渲染')
    if(props)
    return <div>hello,world</div> 
}

const controlIsRender = (pre,next)=>{
   if(pre.number === next.number  ){ // number 不改变 ，不渲染组件
       return true 
   }else if(pre.number !== next.number && next.number > 5 ) { // number 改变 ，但值大于5 ， 不渲染组件
       return true
   }else { // 否则渲染组件
       return false
   }
}

const NewTexMemo = memo(TextMemo,controlIsRender)
class Index extends React.Component{
    constructor(props){
        super(props)
        this.state={
            number:1,
            num:1
        }
    }
    render(){
        const { num , number }  = this.state
        return <div>
            <div>
                改变num：当前值 { num }  
                <button onClick={ ()=>this.setState({ num:num + 1 }) } >num++</button>
                <button onClick={ ()=>this.setState({ num:num - 1 }) } >num--</button>  
            </div>
            <div>
                改变number： 当前值 { number } 
                <button onClick={ ()=>this.setState({ number:number + 1 }) } > number ++</button>
                <button onClick={ ()=>this.setState({ number:number - 1 }) } > number -- </button>  
            </div>
            <NewTexMemo num={ num } number={number}  />
        </div>
    }
}

```

**效果：**

![](https://s.poetries.top/images/202203211401466.png)

完美达到了效果，`React.memo`一定程度上，可以等价于组件外部使用`shouldComponentUpdate` ，用于拦截新老`props`，确定组件是否更新。

### forwardRef

官网对`forwardRef`的概念和用法很笼统，也没有给定一个具体的案例。很多同学不知道 `forwardRef`具体怎么用，下面我结合具体例子给大家讲解`forwardRef`应用场景。

**1 转发引入Ref**

这个场景实际很简单，比如父组件想获取孙组件，某一个`dom`元素。这种隔代`ref`获取引用，就需要`forwardRef`来助力。

```js
function Son (props){
    const { grandRef } = props
    return <div>
        <div> i am alien </div>
        <span ref={grandRef} >这个是想要获取元素</span>
    </div>
}

class Father extends React.Component{
    constructor(props){
        super(props)
    }
    render(){
        return <div>
            <Son grandRef={this.props.grandRef}  />
        </div>
    }
}

const NewFather = React.forwardRef((props,ref)=><Father grandRef={ref}  {...props} />  )

class GrandFather extends React.Component{
    constructor(props){
        super(props)
    }
    node = null 
    componentDidMount(){
        console.log(this.node)
    }
    render(){
        return <div>
            <NewFather ref={(node)=> this.node = node } />
        </div>
    }
}

```

**效果**

![](https://s.poetries.top/images/20210504204037.png)

`react`不允许`ref`通过`props`传递，因为组件上已经有 `ref` 这个属性,在组件调和过程中，已经被特殊处理，`forwardRef`出现就是解决这个问题，把`ref`转发到自定义的`forwardRef`定义的属性上，让`ref`，可以通过`props`传递。

**2 高阶组件转发Ref**

一文吃透`hoc`文章中讲到，由于属性代理的`hoc`，被包裹一层，所以如果是类组件，是通过`ref`拿不到原始组件的实例的，不过我们可以通过`forWardRef`转发`ref`。

```js
function HOC(Component){
  class Wrap extends React.Component{
     render(){
        const { forwardedRef ,...otherprops  } = this.props
        return <Component ref={forwardedRef}  {...otherprops}  />
     }
  }
  return  React.forwardRef((props,ref)=> <Wrap forwardedRef={ref} {...props} /> ) 
}
class Index extends React.Component{
  componentDidMount(){
      console.log(666)
  }
  render(){
    return <div>hello,world</div>
  }
}
const HocIndex =  HOC(Index,true)
export default ()=>{
  const node = useRef(null)
  useEffect(()=>{
     /* 就可以跨层级，捕获到 Index 组件的实例了 */ 
    console.log(node.current.componentDidMount)
  },[])
  return <div><HocIndex ref={node}  /></div>
}

```

如上，解决了高阶组件引入`Ref`的问题。

### lazy

> React.lazy 和 Suspense 技术还不支持服务端渲染。如果你想要在使用服务端渲染的应用中使用，我们推荐 Loadable Components 这个库

`React.lazy`和`Suspense`配合一起用，能够有动态加载组件的效果。`React.lazy` 接受一个函数，这个函数需要动态调用 `import()`。它必须返回一个 `Promise` ，该 `Promise` 需要 `resolve` 一个 `default export` 的 `React` 组件。

我们模拟一个动态加载的场景。

**父组件**

```js
import Test from './comTest'
const LazyComponent =  React.lazy(()=> new Promise((resolve)=>{
      setTimeout(()=>{
          resolve({
              default: ()=> <Test />
          })
      },2000)
}))
class index extends React.Component{   
    render(){
        return <div className="context_box"  style={ { marginTop :'50px' } }   >
           <React.Suspense fallback={ <div className="icon" ><SyncOutlined  spin  /></div> } >
               <LazyComponent />
           </React.Suspense>
        </div>
    }
}

```

我们用`setTimeout`来模拟`import`异步引入效果。

**Test**

```js
class Test extends React.Component{
    constructor(props){
        super(props)
    }
    componentDidMount(){
        console.log('--componentDidMount--')
    }
    render(){
        return <div>
            <img src={alien}  className="alien" />
        </div>
    }
}

```

**效果**

![](https://s.poetries.top/images/202203211402827.png)

### Suspense

何为`Suspense`, `Suspense` 让组件“等待”某个异步操作，直到该异步操作结束即可渲染。

用于数据获取的 `Suspense` 是一个新特性，你可以使用 `<Suspense>` 以声明的方式来“等待”任何内容，包括数据。本文重点介绍它在数据获取的用例，它也可以用于等待图像、脚本或其他异步的操作。

上面讲到高阶组件`lazy`时候，已经用 `lazy` + `Suspense`模式，构建了异步渲染组件。我们看一下官网文档中的案例：

```js
const ProfilePage = React.lazy(() => import('./ProfilePage')); // 懒加载
<Suspense fallback={<Spinner />}>
  <ProfilePage />
</Suspense>

```

### Fragment

`react`不允许一个组件返回多个节点元素，比如说如下情况

```js
render(){
    return <li> 🍎🍎🍎 </li>
           <li> 🍌🍌🍌 </li>
           <li> 🍇🍇🍇 </li>
}

```

如果我们想解决这个情况，很简单，只需要在外层套一个容器元素。

```js
render(){
    return <div>
           <li> 🍎🍎🍎 </li>
           <li> 🍌🍌🍌 </li>
           <li> 🍇🍇🍇 </li>
    </div>
}

```

但是我们不期望，增加额外的`dom`节点，所以`react`提供`Fragment`碎片概念，能够让一个组件返回多个元素。 所以我们可以这么写

```js
<React.Fragment>
    <li> 🍎🍎🍎 </li>
    <li> 🍌🍌🍌 </li>
    <li> 🍇🍇🍇 </li>
</React.Fragment>

```

还可以简写成：

```js
<>
    <li> 🍎🍎🍎 </li>
    <li> 🍌🍌🍌 </li>
    <li> 🍇🍇🍇 </li>
</>

```

和`Fragment`区别是，`Fragment`可以支持`key`属性。`<></>`不支持`key`属性。

**温馨提示**。我们通过`map`遍历后的元素，`react`底层会处理，默认在外部嵌套一个`<Fragment>`。

比如：

```js
{
   [1,2,3].map(item=><span key={item.id} >{ item.name }</span>)
}

```

`react`底层处理之后，等价于：

```html
<Fragment>
   <span></span>
   <span></span>
   <span></span>
</Fragment>

```

### Profiler

`Profiler`这个`api`一般用于开发阶段，性能检测，检测一次`react`组件渲染用时，性能开销。

`Profiler` 需要两个参数：

第一个参数：是 `id`，用于表识唯一性的`Profiler`。

第二个参数：`onRender`回调函数，用于渲染完成，接受渲染参数。

**实践：**

```js
const index = () => {
  const callback = (...arg) => console.log(arg)
  return <div >
    <div >
      <Profiler id="root" onRender={ callback }  >
        <Router  >
          <Meuns/>
          <KeepaliveRouterSwitch withoutRoute >
              { renderRoutes(menusList) }
          </KeepaliveRouterSwitch>
        </Router>
      </Profiler> 
    </div>
  </div>
}

```

**结果**

![](https://s.poetries.top/images/202203211402516.png)

onRender

- 0 -id: `root`  ->  `Profiler` 树的 `id` 。
- 1 -phase: `mount` ->  `mount` 挂载 ， `update` 渲染了。
- 2 -actualDuration: `6.685000262223184`  -> 更新 `committed` 花费的渲染时间。
- 3 -baseDuration:  `4.430000321008265`  -> 渲染整颗子树需要的时间
- 4 -startTime : `689.7299999836832` ->  本次更新开始渲染的时间
- 5 -commitTime : `698.5799999674782` ->  本次更新committed 的时间
- 6 -interactions: `set{}` -> 本次更新的 `interactions` 的集合

> 尽管 Profiler 是一个轻量级组件，我们依然应该在需要时才去使用它。对一个应用来说，每添加一些都会给 CPU 和内存带来一些负担。

### StrictMode

`StrictMode`见名知意，严格模式，用于检测`react`项目中的潜在的问题，。与 `Fragment` 一样， `StrictMode` 不会渲染任何可见的 `UI` 。它为其后代元素触发额外的检查和警告。

> 严格模式检查仅在开发模式下运行；它们不会影响生产构建。

`StrictMode`目前有助于：

- ①识别不安全的生命周期。
- ②关于使用过时字符串 `ref API` 的警告
- ③关于使用废弃的 `findDOMNode` 方法的警告
- ④检测意外的副作用
- ⑤检测过时的 `context API`

**实践:识别不安全的生命周期**

对于不安全的生命周期，指的是`UNSAFE_componentWillMount`，`UNSAFE_componentWillReceiveProps` , `UNSAFE_componentWillUpdate`

```
外层开启严格模式：
<React.StrictMode> 
    <Router  >
        <Meuns/>
        <KeepaliveRouterSwitch withoutRoute >
            { renderRoutes(menusList) }
        </KeepaliveRouterSwitch>
    </Router>
</React.StrictMode>

我们在内层组件中，使用不安全的生命周期:
class Index extends React.Component{    
    UNSAFE_componentWillReceiveProps(){
    }
    render(){      
        return <div className="box" />   
    }
}

效果：
```

![](https://s.poetries.top/images/202203211402367.png)

## 工具类

接下来我们一起来探究一下`react`工具类函数的用法。

![](https://s.poetries.top/images/202203211402146.png)

### createElement

一提到`createElement`，就不由得和`JSX`联系一起。我们写的`jsx`，最终会被 `babel`，用`createElement`编译成`react`元素形式。我写一个组件，我们看一下会被编译成什么样子，

如果我们在`render`里面这么写：

```js
render(){
    return <div className="box" >
        <div className="item"  >生命周期</div>
        <Text  mes="hello,world"  />
        <React.Fragment> Flagment </React.Fragment>
        { /*  */ }
        text文本
    </div>
}

```

会被编译成这样：

```js
render() {
    return React.createElement("div", { className: "box" },
            React.createElement("div", { className: "item" }, "\u751F\u547D\u5468\u671F"),
            React.createElement(Text, { mes: "hello,world" }),
            React.createElement(React.Fragment, null, " Flagment "),
            "text\u6587\u672C");
    }

```

当然我们可以不用`jsx`模式，而是直接通过`createElement`进行开发。

**`createElement`模型:**

```js
React.createElement(
  type,
  [props],
  [...children]
)

```

`createElement`参数：

**第一个参数:**如果是组件类型，会传入组件，如果是`dom`元素类型，传入`div`或者`span`之类的字符串。

**第二个参数:**:第二个参数为一个对象，在`dom`类型中为**属性**，在`组件`类型中为**props**。

**其他参数:**，依次为`children`，根据顺序排列。

**createElement做了些什么？**

经过`createElement`处理，最终会形成 `$$typeof = Symbol(react.element)`对象。对象上保存了该`react.element`的信息。

### cloneElement

可能有的同学还傻傻的分不清楚`cloneElement`和`createElement`区别和作用。

`createElement`把我们写的`jsx`，变成`element`对象;  而`cloneElement`的作用是以 `element` 元素为样板克隆并返回新的 `React` 元素。返回元素的 `props` 是将新的 `props` 与原始元素的 `props` 浅层合并后的结果。

那么`cloneElement`感觉在我们实际业务组件中，可能没什么用，但是在**一些开源项目，或者是公共插槽组件中**用处还是蛮大的，比如说，我们可以在组件中，劫持`children element`，然后通过`cloneElement`克隆`element`，混入`props`。经典的案例就是 `react-router`中的`Swtich`组件，通过这种方式，来匹配唯一的 `Route`并加以渲染。

我们设置一个场景，在组件中，去劫持`children`，然后给`children`赋能一些额外的`props`:

```js
function FatherComponent({ children }){
    const newChildren = React.cloneElement(children, { age: 18})
    return <div> { newChildren } </div>
}

function SonComponent(props){
    console.log(props)
    return <div>hello,world</div>
}

class Index extends React.Component{    
    render(){      
        return <div className="box" >
            <FatherComponent>
                <SonComponent name="alien"  />
            </FatherComponent>
        </div>   
    }
}

```

**打印：**

![](https://s.poetries.top/images/202203211402099.png)

完美达到了效果！

### createContext

`createContext`用于创建一个`Context`对象，`createContext`对象中，包括用于传递 `Context` 对象值 `value`的`Provider`，和接受`value`变化订阅的`Consumer`。

```js
const MyContext = React.createContext(defaultValue)

```

`createContext`接受一个参数`defaultValue`，如果`Consumer`上一级一直没有`Provider`,则会应用`defaultValue`作为`value`。**只有**当组件所处的树中没有匹配到 `Provider` 时，其 `defaultValue` 参数才会生效。

我们来模拟一个 `Context.Provider`和`Context.Consumer`的例子：

```js
function ComponentB(){
    /* 用 Consumer 订阅， 来自 Provider 中 value 的改变  */
    return <MyContext.Consumer>
        { (value) => <ComponentA  {...value} /> }
    </MyContext.Consumer>
}

function ComponentA(props){
    const { name , mes } = props
    return <div> 
            <div> 姓名： { name }  </div>
            <div> 想对大家说： { mes }  </div>
         </div>
}

function index(){
    const [ value , ] = React.useState({
        name:'alien',
        mes:'let us learn React '
    })
    return <div style={{ marginTop:'50px' }} >
        <MyContext.Provider value={value}  >
          <ComponentB />
    </MyContext.Provider>
    </div>
}

```

**打印结果：**

![](https://s.poetries.top/images/202203211402455.png)

---

> 以上是免费部分。完整内容需要「前端进阶之旅」会员，原文：https://feinterview.poetries.top/docs/principle-docs/react/26-React%E5%85%A8%E9%83%A8api%E8%A7%A3%E8%AF%BB