# 一、概述
# 1.1 什么是 Nginx
Nginx (engine x)是一款轻量级的Web服务器 、反向代理服务器及电子邮件(IMAP/POP3)代理服务器
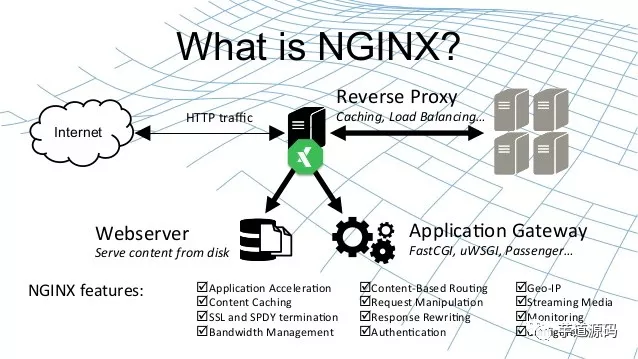
# 1.2 什么是反向代理
反向代理(
Reverse Proxy)方式是指以代理服务器来接受internet上的连接请求,然后将请求转发给内部网络上的服务器,并将从服务器上得到的结果返回给 internet 上请求连接的客户端,此时代理服务器对外就表现为一个反向代理服务器
# 二、使用
nginx 的使用比较简单,就是几条命。
常用到的命令如下
nginx -s stop       快速关闭Nginx,可能不保存相关信息,并迅速终止web服务。
nginx -s quit       平稳关闭Nginx,保存相关信息,有安排的结束web服务。
nginx -s reload     因改变了Nginx相关配置,需要重新加载配置而重载。
nginx -s reopen     重新打开日志文件。
nginx -c filename   为 Nginx 指定一个配置文件,来代替缺省的。
nginx -t            不运行,而仅仅测试配置文件。nginx 将检查配置文件的语法的正确性,并尝试打开配置文件中所引用到的文件。
nginx -v            显示 nginx 的版本。
nginx -V            显示 nginx 的版本,编译器版本和配置参数。
@前端进阶之旅: 代码已经复制到剪贴板
如果不想每次都敲命令,可以在
nginx安装目录下新添一个启动批处理文件startup.bat,双击即可运行。内容如下
@echo off
rem 如果启动前已经启动nginx并记录下pid文件,会kill指定进程
nginx.exe -s stop

rem 测试配置文件语法正确性
nginx.exe -t -c conf/nginx.conf

rem 显示版本信息
nginx.exe -v

rem 按照指定配置去启动nginx
nginx.exe -c conf/nginx.conf
@前端进阶之旅: 代码已经复制到剪贴板
如果是运行在 Linux 下,写一个 shell 脚本,大同小异
# 三、nginx 配置实战
# 3.1 http 反向代理配置
我们先实现一个小目标:不考虑复杂的配置,仅仅是完成一个 http 反向代理
nginx.conf 配置文件如下
注:
conf / nginx.conf是nginx的默认配置文件。你也可以使用nginx -c指定你的配置文件
#运行用户
#user somebody;

#启动进程,通常设置成和cpu的数量相等
worker_processes  1;

#全局错误日志
error_log  D:/Tools/nginx-1.10.1/logs/error.log;
error_log  D:/Tools/nginx-1.10.1/logs/notice.log  notice;
error_log  D:/Tools/nginx-1.10.1/logs/info.log  info;

#PID文件,记录当前启动的nginx的进程ID
pid        D:/Tools/nginx-1.10.1/logs/nginx.pid;

#工作模式及连接数上限
events {
    worker_connections 1024;    #单个后台worker process进程的最大并发链接数
}

#设定http服务器,利用它的反向代理功能提供负载均衡支持
http {
    #设定mime类型(邮件支持类型),类型由mime.types文件定义
    include       D:/Tools/nginx-1.10.1/conf/mime.types;
    default_type  application/octet-stream;

    #设定日志
    log_format  main  '[$remote_addr] - [$remote_user] [$time_local] "$request" '
                      '$status $body_bytes_sent "$http_referer" '
                      '"$http_user_agent" "$http_x_forwarded_for"';

    access_log    D:/Tools/nginx-1.10.1/logs/access.log main;
    rewrite_log     on;

    #sendfile 指令指定 nginx 是否调用 sendfile 函数(zero copy 方式)来输出文件,对于普通应用,
    #必须设为 on,如果用来进行下载等应用磁盘IO重负载应用,可设置为 off,以平衡磁盘与网络I/O处理速度,降低系统的uptime.
    sendfile        on;
    #tcp_nopush     on;

    #连接超时时间
    keepalive_timeout  120;
    tcp_nodelay        on;

    #gzip压缩开关
    #gzip  on;

    #设定实际的服务器列表
    upstream zp_server1{
        server 127.0.0.1:8089;
    }

    #HTTP服务器
    server {
        #监听80端口,80端口是知名端口号,用于HTTP协议
        listen       80;

        #定义使用www.xx.com访问
        server_name  www.helloworld.com;

        #首页
        index index.html

        #指向webapp的目录
        root D:\01_Workspace\Project\github\zp\SpringNotes\spring-security\spring-shiro\src\main\webapp;

        #编码格式
        charset utf-8;

        #代理配置参数
        proxy_connect_timeout 180;
        proxy_send_timeout 180;
        proxy_read_timeout 180;
        proxy_set_header Host $host;
        proxy_set_header X-Forwarder-For $remote_addr;

        #反向代理的路径(和upstream绑定),location 后面设置映射的路径
        location / {
            proxy_pass http://zp_server1;
        }

        #静态文件,nginx自己处理
        location ~ ^/(images|javascript|js|css|flash|media|static)/ {
            root D:\01_Workspace\Project\github\zp\SpringNotes\spring-security\spring-shiro\src\main\webapp\views;
            #过期30天,静态文件不怎么更新,过期可以设大一点,如果频繁更新,则可以设置得小一点。
            expires 30d;
        }

        #设定查看Nginx状态的地址
        location /NginxStatus {
            stub_status           on;
            access_log            on;
            auth_basic            "NginxStatus";
            auth_basic_user_file  conf/htpasswd;
        }

        #禁止访问 .htxxx 文件
        location ~ /\.ht {
            deny all;
        }

        #错误处理页面(可选择性配置)
        #error_page   404              /404.html;
        #error_page   500 502 503 504  /50x.html;
        #location = /50x.html {
        #    root   html;
        #}
    }
}
@前端进阶之旅: 代码已经复制到剪贴板
好了,让我们来试试吧
- 启动
webapp,注意启动绑定的端口要和nginx中的upstream设置的端口保持一致 - 更改
host:在C:\Windows\System32\drivers\etc目录下的host文件中添加一条DNS记录127.0.0.1 www.helloworld.com - 启动前文中
startup.bat的命令 - 在浏览器中访问
www.helloworld.com,不出意外,已经可以访问了
# 3.2 负载均衡配置
- 上一个例子中,代理仅仅指向一个服务器
- 但是,网站在实际运营过程中,多半都是有多台服务器运行着同样的
app,这时需要使用负载均衡来分流 nginx也可以实现简单的负载均衡功能
假设这样一个应用场景:将应用部署在
192.168.1.11:80、192.168.1.12:80、192.168.1.13:80三台linux环境的服务器上。网站域名叫www.helloworld.com,公网IP为192.168.1.11。在公网IP所在的服务器上部署nginx,对所有请求做负载均衡处理。
nginx.conf 配置如下
http {
     #设定mime类型,类型由mime.type文件定义
    include       /etc/nginx/mime.types;
    default_type  application/octet-stream;
    #设定日志格式
    access_log    /var/log/nginx/access.log;

    #设定负载均衡的服务器列表
    upstream load_balance_server {
        #weigth参数表示权值,权值越高被分配到的几率越大
        server 192.168.1.11:80   weight=5;
        server 192.168.1.12:80   weight=1;
        server 192.168.1.13:80   weight=6;
    }

   #HTTP服务器
   server {
        #侦听80端口
        listen       80;